Jo Top
a free knit pattern
by Beatriz P. Martín
Today I’m sharing with you all a new free pattern to celebrate the release of my new Summer Tops Collection, in 100% linen.
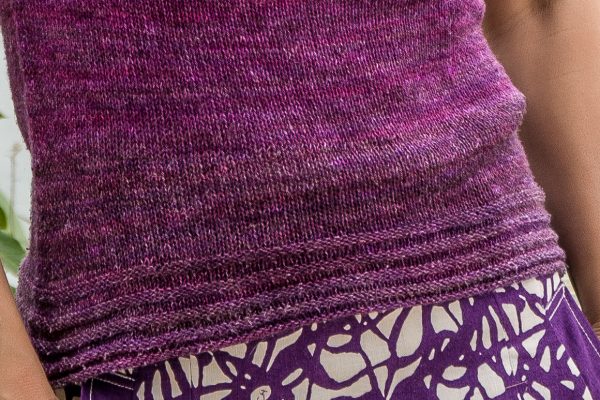
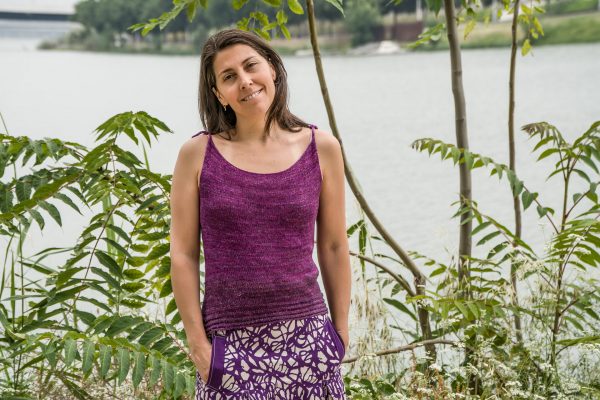
The Jo Top is a very easy to work design, resulting in a very comfy and cool garment, for everyday wear, this summer. Depending on the yarn used it will come out sporty (thin cotton or linen) or a lot more dressy if knit in silk, such as the one shown (malabrigo Mora Mulberry Silk).
So why this name? Jo is the main character in the Funny Face movie, played by Audrey Hepburn. This Top was devised while working some exercises in one of the design workshops I have taught and it is inspired by the Paris of the cultural avant-garde, this character, and of course the actress that plays it, were super inspiring to me.

Materials
- Yarn
- Meters 470 (520, 570, 620, 670) m fingering weight silk, linen or cotton
- Yards 514 (570, 625, 680, 735) yd fingering weight silk, linen or cotton
- Recommended Yarn malabrigo Mora 100% Mulberry Silk 3 (3, 3, 4, 4) skeins
- Needles Circular Needles in 3 mm (US 2½), 3.5 mm (US 4) and 80 cm (32″) cable.
- Stitch Markers
Shown in malabrigo Mora, Sabiduría color way.
Gauge 22 sts x 33 rnds = 10 x10 cm (4×4″), after blocking (3,5 mm or US 4 needles) in st st.
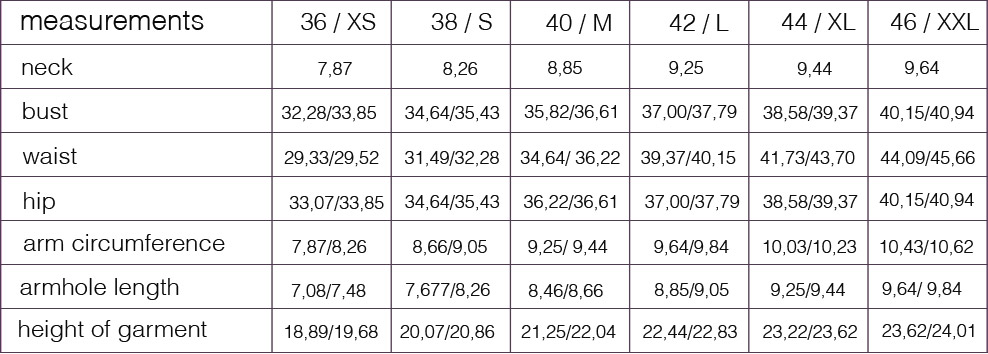
Sizing XS 36, (S 38, M 40, L 42, XL 44, XXL 46)
Sizes are specified with the numbers in brackets, the first being size 36 (XS), out of the bracket and then inside the bracket are (38/S, 40/M, 42/L, 44/XL), the top has 2cm (0.7″) of positive ease, this will help you choose a size that is more fitted or looser. The measurements in the table are in inches (see table for measurements in cm here). Measurements given are for the body, not the garment, and must be taken snugly.

All the abbreviations for this pattern.
Construction Notes
The Jo top is worked bottom-up and in the round. It is started by the lower edge ribbing, and then worked in st st to the underarm, when stitches are bound off on both sides and the back and front are worked flat, back and forth (knitting the RS and purling the WS). Short rows are worked to shape the neckline and after that all sts are bound off, except for a couple on each side to work the shoulder straps.
Pattern
With the smaller sized needle, 3 mm (US 2½), CO 89 (99, 109, 119, 129) sts, pm to mark the side seam and CO another 89 (99, 109, 119, 129) sts, pBoRm (use a marker that will stand out from the rest) and join in the round, taking care not to twist the sts.
Ribbing
Rounds 1 to 3: purl
Rounds 4 to 6: knit
Repeat these 6 rounds 4 more times.

Body: change to the needle size you got gauge with (3,5 mm or US 4) and begin waist and bust shaping as follows.
Decrease Round: *k1, k2tog, k to 3 sts before side m, ssk, k1, slm, repeat from * one more time.
Continue in st st and work a Decrease Round every 6th (8th, 8th, 10th, 10th) round, one more time, a total of 2 times.
After the las Decrease Round work 10 (12, 14, 16, 18) rounds and work:
Increase Round: *k1, m1l, k to 1 st before side m, m1r, k1, slm, repeat from * once more, to end of round.
Work a Increase Round every 6th (8th, 8th, 10th, 10th) round, one more time, a total of 2 times.
After completing this section you will have a total of 178 (198, 218. 238, 258) sts on your needles.
Continue in st st until the garment measures 35’5 (36, 36’5, 37, 37’5, 38) cm or 14 (14.2, 14.4, 14.6, 14.8, 15) inches from the cast on edge.
Last Round before dividing for underarms: k to 5 (5, 6, 7, 8) sts before the end of round, BO the sts left to end the round, remove BoRm.

Underarm Shaping
Divide Front & Back Round: BO the next 5 (5, 6, 7, 8) sts, k to 5 (5, 6, 7, 8) sts before side m and BO those 5 (5, 6, 7, 8) sts, remove side m, BO the next 5 (5, 6, 7, 8) sts, k to end of round.
You will now have split the top’s front and back.
Front
From now on, you will work flat (back and forth) the front of the garment first and then the back. Place the back sts on hold onto waste yarn, auxiliary cable or stitch holder until the front is finished.
Next Round: purl
Continue in st st until your work measures 9.20 (9.60, 10, 10.40, 10.80, 11.20) cm or 3.5 (3.7, 3.9, 4.1, 4.3, 4.5) in from the bound off sts from the underarm, ending with a purl row.
Front Neck
Begin working Short Rows to shape the front of the garment’s neckline:
Row 1 (RS): k 34 (34, 39, 39, 44, 44) sts, W&T (tutorial here).
Row 2: p
Row 3: k to 5 sts before the last wrapped st, W&T on that st.
Row 4: p
Repeat the last 2 rows 4 (4, 5, 5, 6, 6) more times.
Next Row: knit all sts, knitting the sts and their wraps together as you find them.
It is now time to shape the other side of the neck on the WS, you will now work the W&T on purl sts, as follows:
Row 1 (WS): p 34 (34, 39, 39, 44, 44) sts, W&T.
Row 2: k
Row 3: p to 5 sts before the last wrapped st, W&T on that st.
Row 4: k
Repeat the last 2 rows 4 (4, 5, 5, 6, 6) more times.
Next Row: purl all round, purling the sts and their wraps together as you find them.
The shaping for the front neck is now finished and we just need to bind off all sts except a couple on each side, to work the shoulder straps:
Shoulder Straps
Next Row: k6, loosely BO as if to knit (use a bigger sized needle if you tend to BO too tight, or your neckline will not have any give) to the last 6 sts, k6.
Work an I-Cord with the 6 remaining sts on each side (there’s an I-Cord video tutorial here), using DPNs as follows:
Row 1: Instead of your needles changing hands, slide all sts you just worked to the other end of your LN, so that the working yarn is on the furthest side from the needle tip, and knit them again giving the working yarn a good tug so that there are no holes in your work (k6).
Row 2: work just as Row 1.
Repeat these two rows until you strap measures 11 to 15 cm long, or 4.5 to 6 inches.

Back Neckline
Repeat the instructions for the Front Neck but only after the work measures 10.20 (10.60, 11, 11.40, 11.80, 12.20) cm or 4 (4.2, 4.3, 4.5, 4.6, 4.8) in from the bound off sts from the underarm, so that it stands a bit taller than the front, ending with a purl row.
Finishing
Weave ends in and wash the top with a mild soap and a bit of fabric softener: Fill a sink or bucket with lukewarm water and add a bit of mild soap or wool wash, soak the garment completely, and gently squeeze, removing all air, making sure it is entirely wet. Let it soak for approx 30 minutes. Drain the sink or bucket and refill it with cool water. Keep rinsing the item until the water is clear and without suds. You can add a little fabric softener. Never place the item directly under the tap or water stream. Once rinsed, squeeze the water out with your hands and wrap with a clean, dry towel and squeeze again (your own body weight can help remove excess water). The garment must end up a bit wet, but not soaked. Extend the garment over a flat surface and flatten out any wrinkle or crease, stretch to the specified size. Let dry flat, away from direct sunlight.

I hope you enjoy this design, it a summer basic to me :).
Be happy!
B.
Don’t forget to visit Jo’s ravelry page, to add to your favorites or start your project!
[printfriendly]
Más Patrones
[products ids="6961,6924,6962,6965,6966,7240" per_page="6" columns="3" orderby="sales"]

